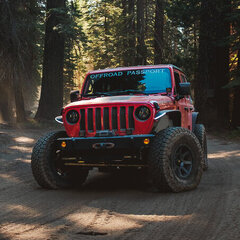
ob1jeeper 849 Posted May 31, 2025 Nicely done Ryan... ;) 1 Share this post Link to post Share on other sites
4x4tographer 3,642 Posted May 31, 2025 A few favorite snaps from our recent trip along the Mogollon Rim. 3 1 Share this post Link to post Share on other sites
4x4tographer 3,642 Posted January 5 Santa Claus brought some shiny new rear inner fenders to match the fronts that I put on shortly before running the Rubicon Trail in 2024. These are a 4-piece design from Motobilt. I wanted to clean up the look of my MacGuyver'd rear fender liners that I sliced up to work with the KBD fender flares and maybe get just a touch more clearance for the 37s in the rear. The install was pretty straightforward. The 4 part design mated up easily, once you figure out where each piece goes. 3mm allen head screws all around. Had to remove the KBD fenders for the final install, which takes about 2 minutes with a screwdriver. Did a little wipe-down of the paint where the fenders have trapped some debris. You'll need to supply your own washers, Motobilt skimped there. I'm using a large washers on the rearward hole as it's larger than the head of the supplied bolts. The instructions recommend you bolt up the two bottom attachment points, but it's an exceedingly TIGHT fit to get a wrench back there to hold a nut (and they don't give you any fridge washers), so I used some push-in panel "Christmas trees". The fender liner is SOLID with the overall attachment points, so figure the trees are OK. Fender reinstalled - the body is jacked up for easier access to work on the install. Ride height: Took a little spin to let the suspension settle back down again. Overall, pretty happy with the look, clearance, and match-up with the front fender liners. 1 Share this post Link to post Share on other sites
4x4tographer 3,642 Posted January 5 (edited) Another quickie-mod. Picked up some molle panels from AAL a few months back and finally got around to installing them. It's about a 20-min job, leveraging the existing hard top mounts on the JL. The panels are pre-cut with a standard molle pattern and have numerous mounting holes. The panels are aluminum and are "buttressed" with some little arms for added strength/rigidity. On the passenger side, I plan to add a larger molle storage pouch. Looking to see if I can find a "deep" pouch that might run the length of the panel and open from the side. We'll see if it pans out. Because I have the factory Alpine subwoofer in my JL, you only get the top panel here. On the driver side, you get a little more space to play. Ignore the slopping wiring, but my current power distribution panel is over here. This runs power direct from my main battery to the rear of the Jeep with a bunch of Anderson connectors to run my fridge, tailgate lighting, and a portable RoadPro oven. Ultimately, I plan to install a new Bluetti Charger 1 DC-DC charger on the top panel to perform quick charges of a portable lithium battery system I recently picked up. Edited January 5 by 4x4tographer 3 Share this post Link to post Share on other sites
4x4tographer 3,642 Posted January 13 Some new tools to help with a new project/repair. A "pickle fork" set from Harbor Freight. Over the last year I've developed a bit of a "shimmy" or axle tramp at around 50-55mph. It's minor to moderate, depending on the road and speed, occurring about 50% of the time. It feels like it's gotten worse over time. Once you get up to 60mph+ it disappears entirely. The HD Fox ATS dampener helps with shimmy, but it's still present. In terms of my steering setup, I have a complete aftermarket system: Metalcloak HD chromoly tie rod with 1-ton TREs (62K miles) Metalcloak HD chromoly drag link with 1-ton TREs (62K miles) Steersmarts sector shaft/trackbar brace (17K miles) Teraflex HD balljoints (25K miles) Factory steering box (upgraded cast iron box, replaced under a TSB from the original aluminum box - 70K miles) Fox ATS adjustable dampener (17K miles) Since the TREs are the oldest component in the mix here, I decided to swap them out with the brand new spares I have, leftover from preparing for the Rubicon Trail back in 2023. These are Metalcloak TREs with heavy duty 1-ton forged ends. In all, the job was pretty straightforward. Started with jacking up the Jeep, removing the wheels, and disconnecting my swaybar end links to gain a little extra room to work. I also needed to disconnect my heavy-duty Fox ATS steering dampener so the tie rod could be removed entirely. The Metalcloak steering components are all locked into place with jam nuts. Previously, I'd had a lot of trouble getting these loose to make adjustments as they'd seized on and my crow foot wrenches kept flexing/slipping and rounding off the nuts. I invested in a huge 15" crescent wrench which helped out tremendously - however the driver side nut was seized on pretty good. I used some PB Blaster and a torch to help loosen it up. You can see previous attacks on the drag link jam nuts from my last adjustment. Here's the removed drag link with attached dampener. The old and new TREs. The pickle forks were picked up to make it easier to pop the pitman arm-side of the drag link off. There's next to zero room to work on that end of the Jeep. Here you can see the old TRE, oozing 5-6 years of grease. Once it "popped" with the pickle fork. It squished a ton of old grease out all over the place. The removed drag link. Shiny new ends installed. Granted, I'm no mechanical expert, but I think the boots on the TREs are interesting. The tie rod TREs both have "vented" boots, with a weep hole for extra grease to flow out when you're filling them up. The drag link boots, however, do NOT have any sort of weep hole. No clue why. This was true with the original TREs installed 5-6 years ago, so the design hasn't changed. After getting everything reinstalled, I had to set my toe. I ended up going 1/8 toe in (which I had it at previously) using some 24" alignment bars. That said - the damn shimmy persists. Next up, I'll try reducing the toe in to 1/16 or less to see if that makes a difference. If that doesn't fix it, my "order of operations" will be to: Rotate tires / balance. Inspect the trackbar bushings and mounting holes. The bushings are 6 years old and have just as many miles as the TREs (62,000 miles), though I did replace the axle side Johnny Joint with a new duroflex end joint from Clayton just a year ago. It's possible the axle-side mount hole is wallowed/ovaled. Adjust ball joint pre-load. The BJs themselves are the newest component in the system and I don't exactly wheel all of the time, so I'm thinking they're probably OK. Inspect upper/lower control arm bushings. Front shocks (62,000 miles on them) Share this post Link to post Share on other sites
ob1jeeper 849 Posted January 17 (edited) A couple of thoughts regarding shimmy (properly termed as Axle Tramp for solid axle Jeeps, etc.) But it is mostly known as the dreaded "death wobble". FWIW: "axle Tramp" is common to ALL "live-steered" vehicles... IE: any vehicle with a solid front (steered) axle). Yes... Even Class 8 Trucks (Semi's), school busses, etc. etc. To overcome this tendency, there are a number of things that are done during the design/development process to minimize it. Below is a list of some of the "bigger" things to consider, that are used during the design and development phase to control this aspect of the use of a live steered (solid) front axle... 1- Alignment (Caster, Camber, Toe) 2- Kingpin inclination angle set to have the point at which if extended to the road surface, as close as practical to the center of the tire contact patch. 3- Built-in hysteresis, normally a mechanical device (friction or hydraulic) device added to help control this natural tendency. ie: (steering dampers) 4- Front suspension pivots and bushings with compliance tuned to avoid the wrong frequencies for that product. 5- The intentional mis-matching of the compliance frequency rate ( "tuning" ) of all of the heavy equipment of the vehicle's mounts, (aka: drivetrain) to ensure the frequencies of the mounts do not match the harmonic that is naturally present with "shimmy". 6- The intentional tuning of tire hysteresis to help dampen this phenomenon... ITEM # 2 & 6 is THE most common rule broken, when installing g larger tires (width AND diameter) because those items BOTH push the center of the tire contact patch outside of the kingpin's intersect with the road surface. The Large tires RARELY have similar hysteresis dampening qualities of the OEM size & construction. Finally, the addition of wheels with more offset, further break the rule of kingpin inclination meeting the center of the tire contact patch, increasing the odds for axle tramp/shimmy/D-wobble to occur. I said all this to help your understand what is supposed to be, and to point out that ITEM #3 is THE LARGEST TOOL (and simplest one) the aftermarket has to help mask/reduce the sins caused by undoing the things designed/developed into the product, in attempts to reduce tramp during design development, listed in item 2... Once final item to consider... Most "larger" after market tires used have a load range higher than the vehicle actually needs or was designed for, as most folks want a "tougher" tire for trail riding. For those tires, I recommend trying lower pressures than you would use for standard tires, as this helps lower their compliance frequency.. (AKA: makes them "less bouncy") hopefully far enough to get "out of tune" with the axle tramp frequency created by the added tire mass... Finally, I have NOT spoken to nor addressed wornout parts, or loose fasteners, as those items should be self-explanatory.... Hope this helps you as you work through this issue... Edited January 17 by ob1jeeper added note 1 1 Share this post Link to post Share on other sites
4x4tographer 3,642 Posted February 16 Welp, I recently pulled the trigger on something I’ve been eyeing for a while — a Bluetti Elite 100 V2 and their DC-DC charger, the Charger 1, to go with it. The 100 V2 is essentially a 1024Wh LiFePO4 battery and pure sine wave inverter. It puts out a solid 1800W continuous (2700W surge) of juice, and has a bunch of ports (4× AC, USB-A and USB-C, 12V DC, etc.). The whole thing is surprisingly compact, weighing in at 25 lbs and fits nicely on my AAL cargo shelf in the rear. A game-changer is the Charger 1. I've tapped into a 4GA wire I already had running to the rear of the Jeep. The Charge 1 pulls up to 560W while driving and can fully recharge the Bluetti in about 2 hours drive-time, which is perfect for our multi-day overland trips. To get everything wired up, I picked up American Adventure Labs "side molle" panels, which bolt directly into the same mount points as the hardtop. Originally, I'd directly wired a PDC from Blue Sea into the 4GA I'm running from my main battery. The panels have a ton of convenient mounting holes for adding a bunch of different accessories. I've been running it in this config for a few months now until I could get around to this project. Below is a shot where I've installed the Bluetti Charger 1 and the Blue Sea PDC. Additionally, I added a pair of Blue Sea bus bars rated to handle 100 amps each. These now serve as common power/ground terminals for me to hook up various bits of equipment, such as the DC-DC charger and the PDC. The Bluetti Charger also requires a 60 amp breaker - it comes with one, but I opted to go with a more robust marine unit from Blue Sea - it should be more vibration resistant and has more robust mounting points. At the bottom of the top panel, I added a 1/4" strip of aluminum since the bolt points didn't mount up precisely with the Charger 1. Here's the panel all mounted in the rear. Main power and ground all connected to the bus bars. The Charger 1 can detect when the alternator is running - which is nice - so you only need to hook up the positive and negative leads to the unit. Here's a test run. I was running my fridge on full-power mode using one of the 12v DC connections while the engine was running. The DC-DC charger was outputting around 500-550w of juice to the battery. Both the Bluetti 100 v2 and the Charger 1 connect my phone via bluetooth for monitoring and control. Pretty nice! Out of the box, the Charger defaults to 26v output. With the output settings tweaked to the specifics for the Bluetti 100 v2 it outputs 56v. Here's the DC-DC charge screen: Here's the power station's screen: Some more photos of the install: 6 1 Share this post Link to post Share on other sites
Lichen 215 Posted February 21 I'm a little confused, Ryan. If the engine is NOT running, will this power things like your fridge and help recharge your battery? Share this post Link to post Share on other sites
4x4tographer 3,642 Posted February 25 (edited) On 2/21/2026 at 1:40 PM, Lichen said: I'm a little confused, Ryan. If the engine is NOT running, will this power things like your fridge and help recharge your battery? Hey Marcus! Good question. Yes - the Bluetti Elite 100 v2, which I suppose I neglected to post a photo of, is a portable power pack (DC and AC, including a charge controller, inverter, and solar generator). The fridge plugs into the power pack. The power pack is charged while I drive from the Bluetti Charger 1 DC-DC charger. Alternator/Main >>> DC-DC Charger >>> Power Pack >>> Fridge (or any other DC or AC accessories). I got to test it out this weekend on our annual Crown King Run. The below is a look at the fridge running off of the battery only over night. Fired up the fridge in my Jeep, plugged into the battery (fully charged), at about 8pm. The fridge was full of garage temperature water bottles and the ambient temp was 78 degrees. I set a target temperature of 28 degrees. The fridge was in "full power mode" (my SetPower RV45 fridge has both "power" and "eco" modes) By the time I checked in the next morning it was a frosty 28 degrees and I still had about 55% battery left. After a quick 30 min drive to the trailhead, my battery was back up to 72%. Side note: In my "warm 78 degree garage test", my RV45 fridge pulled about 56 watts of power in "full power" mode. Switching it to eco mode dropped it to 26 watts. I'll have to test this in a more controlled environment to see how much power it draws once it hits the target temperature in both modes. Below is a screen grab from the mobile app when I remembered to grab one before I left to hit the trail. You can see how the fridge compressor cycles became less and less frequent/long as the fridge chilled. Unfortunately, on the trail, I ran into a little snafu. I noticed the battery wasn't charging. In my troubleshooting I checked: My 100 amp breaker under the hood (that feeds the 4AWG wire that runs from the main battery to the rear of the Jeep) My 60 amp breaker at the DC-DC charger A 40 amp fuse under the passenger seat (note to self: I should probably up this to a 60 amp) When checking the 40 amp fuse, I must have tugged a little too hard and pulled the wiring out of the crimped barrel connector - completely severing power to the rear. Doh!!! At this point, I simply range the fridge off of the battery pack all day without the ability to charge it (and unable to run the fridge off the main battery since I severed my connection to the rear). It ran from 7:00 AM to 7:00 PM, kept the fridge running at 28 degrees, including ~45 minutes pushing 90-120 watts to my RoadPro portable oven (reheating a burrito for lunch). By the time I got home, I still had 45% charge left (down from a starting 72% charge) on the battery pack. Not too shabby. in my opinion! So - some next steps for me: Repair the wiring (probably going to install a bus bar) Update the 40amp under seat fuse Design/order a battery pack "cradle" for the Bluetti from SendCutSend Edited February 25 by 4x4tographer 3 Share this post Link to post Share on other sites
Lichen 215 Posted February 25 Thanks. Now it makes sense and the photo helped. Pretty cool setup. Share this post Link to post Share on other sites