Curly 1,317 Posted August 29, 2023 We keep our rear seats folded up 99% of the time. The original idea for a 4 door truck was to allow us to haul one set of our married children w/spouse, but that was before we had grandkids. Now that we are at 5 grands the truck won't be used for that. Instead, it has become an internal trunk. I've even had my Jeep fridge in there for weekend camping trips. 3 Share this post Link to post Share on other sites
SonoranWanderer 715 Posted August 29, 2023 (edited) 11 hours ago, Curly said: We keep our rear seats folded up 99% of the time. The original idea for a 4 door truck was to allow us to haul one set of our married children w/spouse, but that was before we had grandkids. Now that we are at 5 grands the truck won't be used for that. Instead, it has become an internal trunk. I've even had my Jeep fridge in there for weekend camping trips. Same in that the rear seat area is mostly a trunk to me. Need to figure out how to secure the loads back there for rough trails. Should check if I can lay flat in it too for when I don't feel like popping a tent. Also should do another ECdD run just to break it in. Edited August 29, 2023 by SonoranWanderer 4 Share this post Link to post Share on other sites
Bradywgn71 1,008 Posted August 29, 2023 Congrats!! We miss our RAM truck. Hoping in the next few years to get one again. 1 Share this post Link to post Share on other sites
Ladybug 699 Posted August 30, 2023 What a beautiful truck!! Love it!!! And you can't beat a Power Wagon, IMHO! Congrats!!! smiles, ladybug 1 Share this post Link to post Share on other sites
SonoranWanderer 715 Posted September 15, 2023 (edited) The next little mod is exactly that, little. But its both handy and necessary for the next two jobs, electric steps and ham radio. On RAM 3/2500 series trucks and maybe others, if you have an automatic transmission, there is still a clutch control hole in the firewall with a hard plug over it. The plug is the diagonal black cover in the hole in the firewall insulation. Remove the plug and drill it and you don't have to damage the vehicle to run wires in. Side note, it's a pet peeve that instructions for the AMP Research electric steps ignore this hole and suggest you slice the steering boot. Note, if you have the factory six switch auxiliary power control, the hole is hidden behind the aux power box. You will have to pull the power box to easily access this plug. The inside nuts are just outside of and above the steering column, the plug itself (Mopar 52107875AB if you mess it up and need a replacement) I drilled just over a 1 inch hole and inserted a wire boot I found on Amazon. Assembled with excess boot trimmed and glue sealed. The electric steps have five control wires, add to that RG316 ham radio antenna wire (thin), plus a +/- paired 10 gauge power wire (40 amp fused) to terminate on a power block inside the center console for the ham radio and any additional permanent or temporary accessories. Edited September 15, 2023 by SonoranWanderer 1 Share this post Link to post Share on other sites
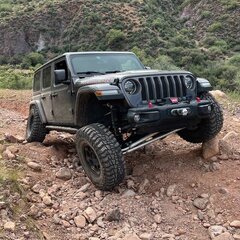
SonoranWanderer 715 Posted September 15, 2023 I wanted to get the Rebel out on some dirt so I took it down Schnebly Hill road (I17 -> Sedona). 2 Share this post Link to post Share on other sites
SonoranWanderer 715 Posted September 15, 2023 (edited) Installed my Yaesu FTM-400 ham radio which meant pulling wire and completely removing the center console. Only 6 panel pieces, 6 bolts, and two wires to remove the entire unit. Quick note, lift the rear of the console up and then pull back or a couple of screw heads may pull off the trailer brake override control face. Ask me how I know. The picture I forgot to take was putting a one inch hole in the bottom rear (slanted surface) of the console to pop the wire up into the console. Final product: The antenna is using a Diamond lip bracket, the radio body and head are using 3M removable Velcro tape. I used a copious number of Velcro strips for solid attachment, and it is solid. I will be relocating the head once an A-pillar grab bar mount becomes available. It's usable for now but not ideal for viewing while driving. Not pictured with the radio body is the Anderson power pole brick for other accessory power attachment. Right now the radio is directly plugged to the 10 gauge wire (power pole connection). The brick needs to be screwed in but I need to acquire a couple 1/4 inch plastic or wood screws, The radio body speaker points into the console body below the junk drawer/arm rest which makes a nice sound chamber for loud crisp vocal audio. Edited September 15, 2023 by SonoranWanderer 1 Share this post Link to post Share on other sites
jgaz 750 Posted September 15, 2023 It’s nice to see clean, well done, accessory installations. 2 Share this post Link to post Share on other sites